Getting Started with HotelFriend PMS: Initial Hotel Setup and Basic Configuration
Welcome to HotelFriend! Before you can start creating bookings or managing reservations, you’ll need to complete some essential setup steps in your Property Management System.
This guide walks you through the foundational settings required to start using the HotelFriend platform and ensure that your business operations are compliant and optimized from day one.
Step 1: Set up VAT rates
VAT rates define how tax is calculated across your services, and accurate setup is critical for legal compliance and financial reporting.
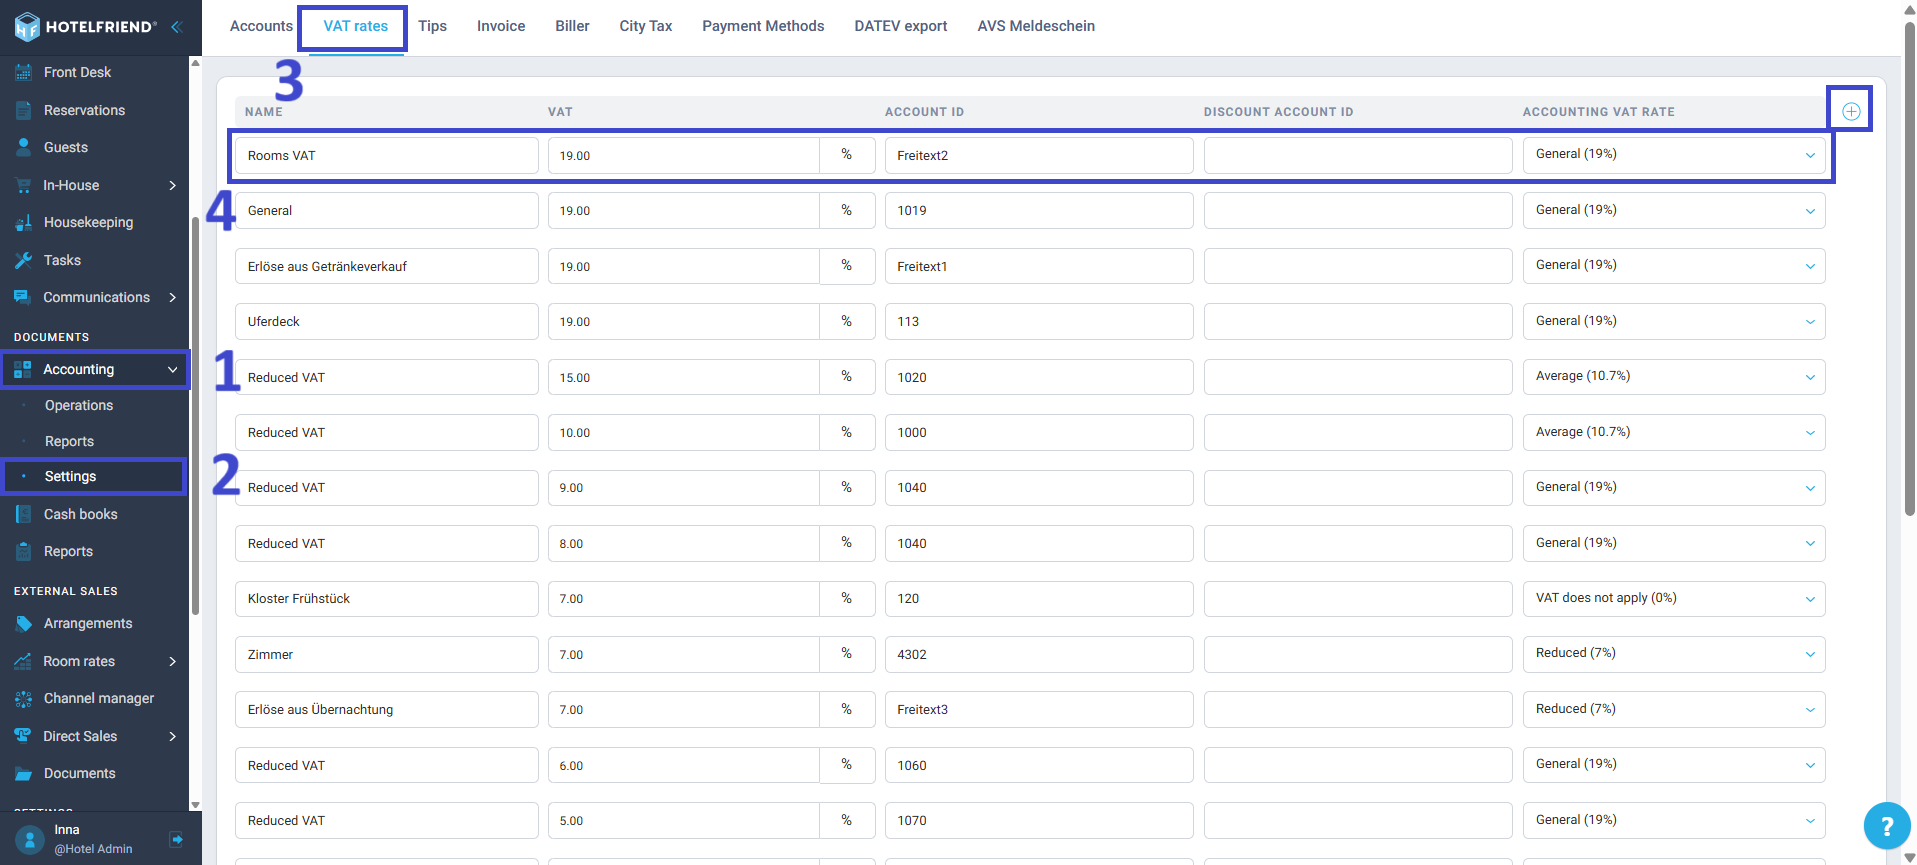
- Navigate to the Accounting module in the main menu on the left.
- Click on the Settings section.
- Open the VAT Rates tab.
- For each VAT rate, fill out the following fields:
- Name – e.g., "Standard 20%", "Reduced 7%", etc.
- VAT % – The actual percentage to be applied (e.g., 20).
- Account ID Number – Your accounting code for this VAT rate.
- Discount Account ID Number – Accounting code for VAT discounts.
- Accounting VAT rate – Rate used for financial reports.
- Click Save.
- Once your VAT rates are saved, scroll down and assign them in the drop-down menus for:
- Rooms VAT %
- Services VAT %
- Prepayments VAT Manual %
- Click Save again to confirm your settings.
Here is how to set VAT rates:
Click the “+” button to add more rates if needed. To remove an entry, click the “-” button.
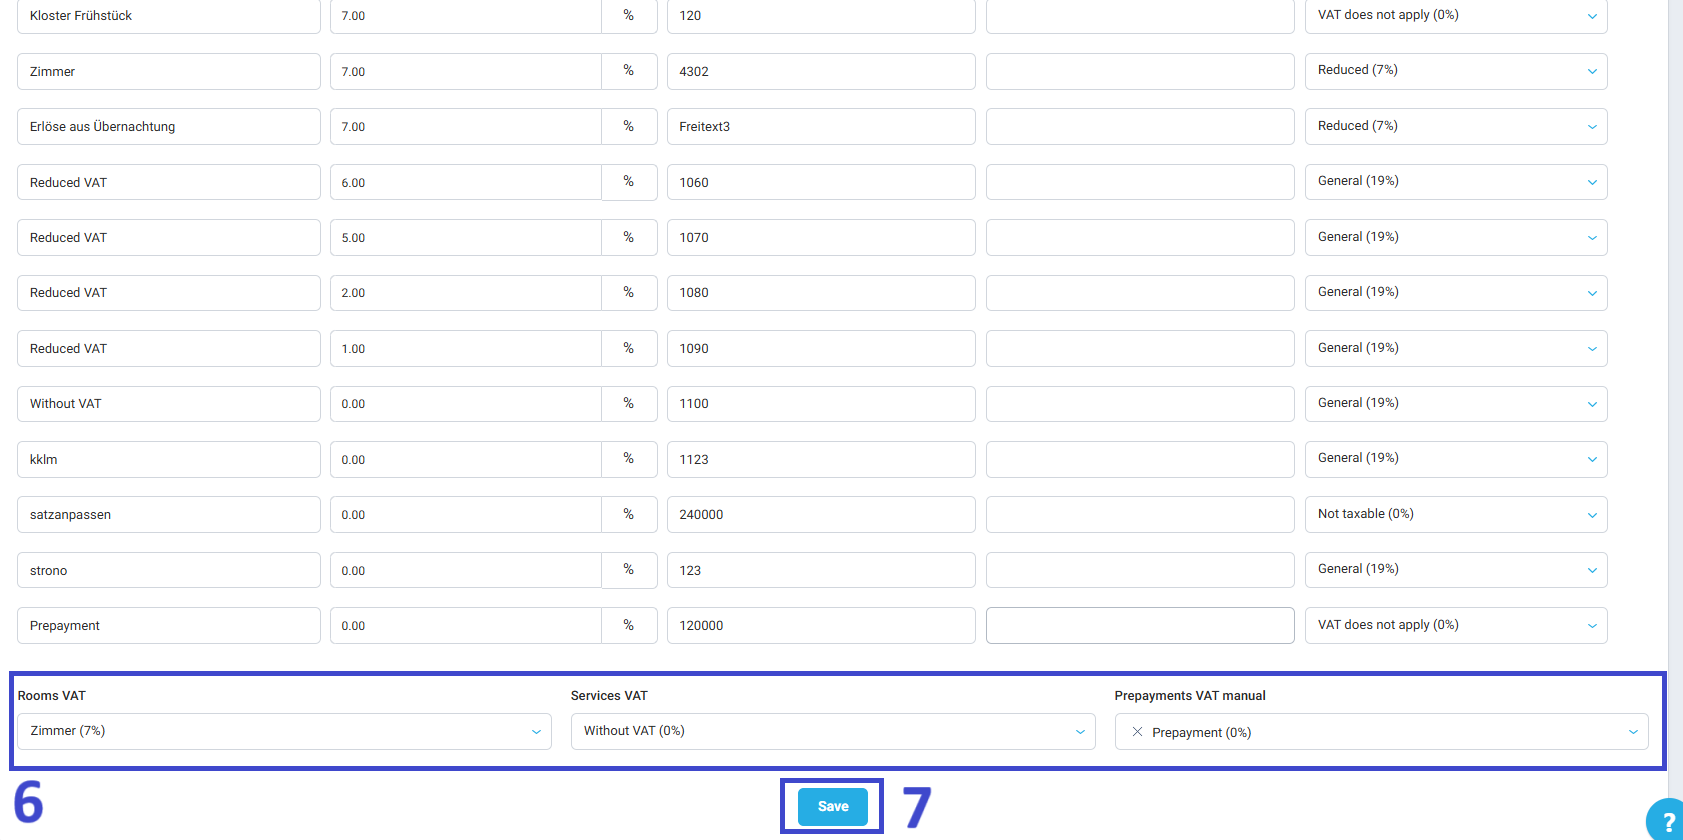
Tip: VAT rates defined here will automatically apply to invoices, payments, and financial reports throughout the system. Double-check the values with your accountant or tax advisor.
Step 2: Create Rooms and Room Types
Rooms and Room Types determine how your property’s inventory is structured. Accurate categorization ensures that your reservations are handled and integrated correctly with your Booking Engine or connected channels.
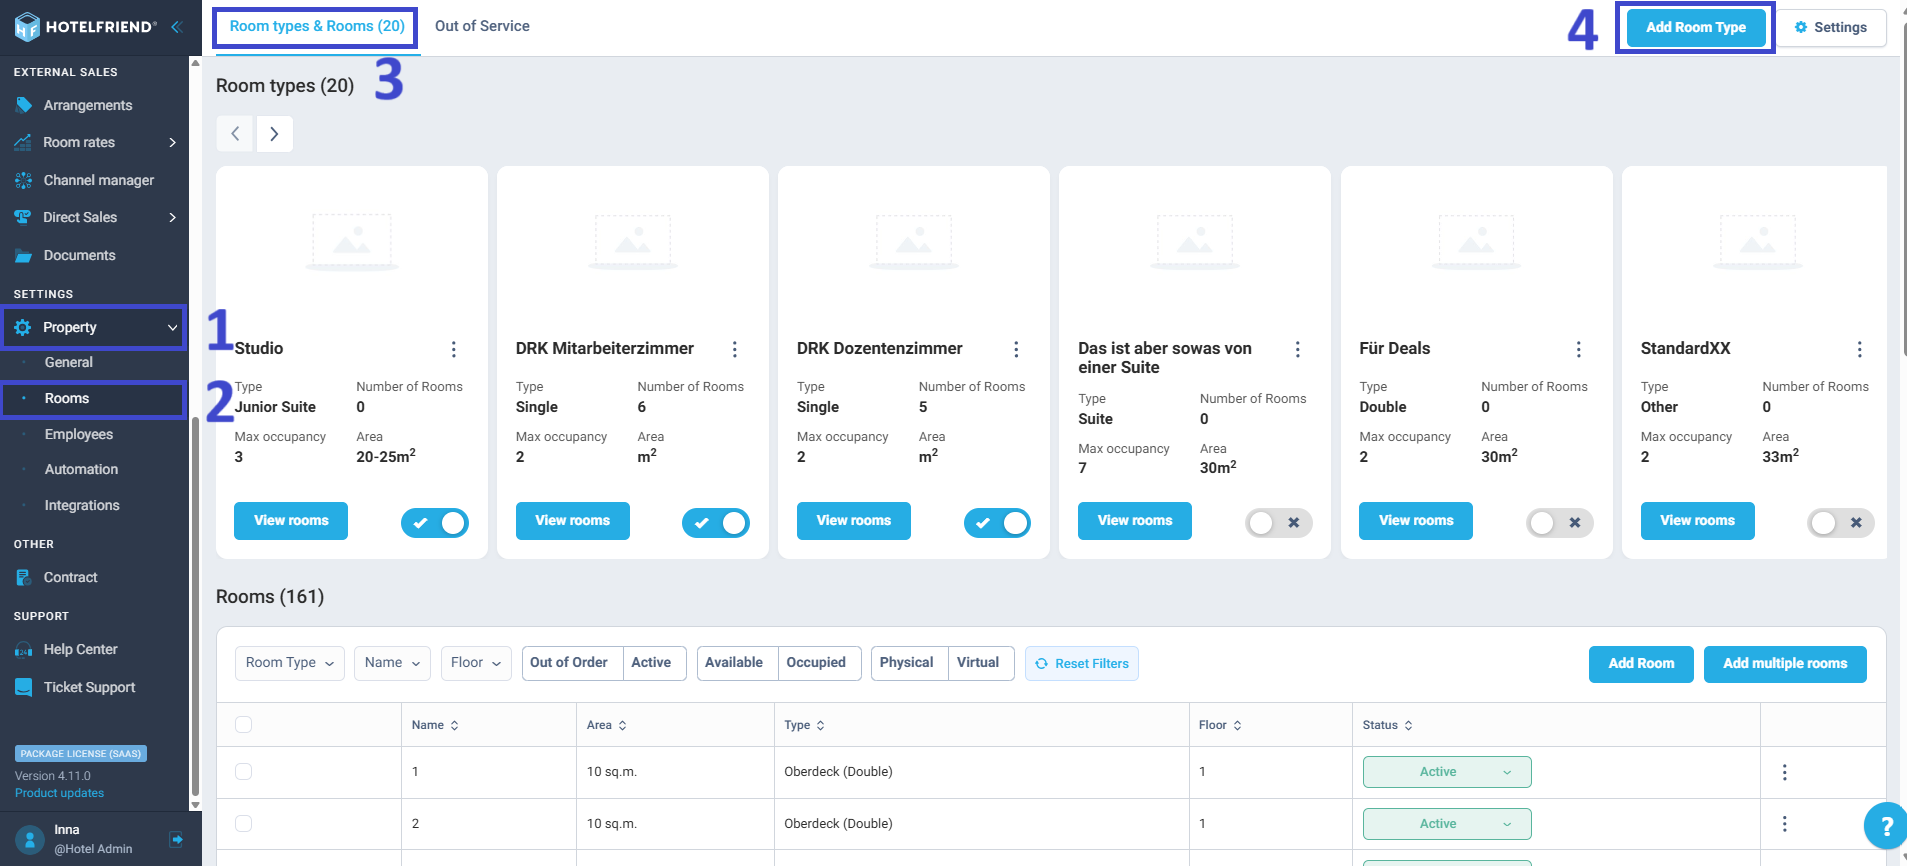
- Go to the Property module in the left-hand menu.
- Select the Rooms section.
- Go to the Room types & Rooms tab.
- Click Add Room Type in the top-right corner.
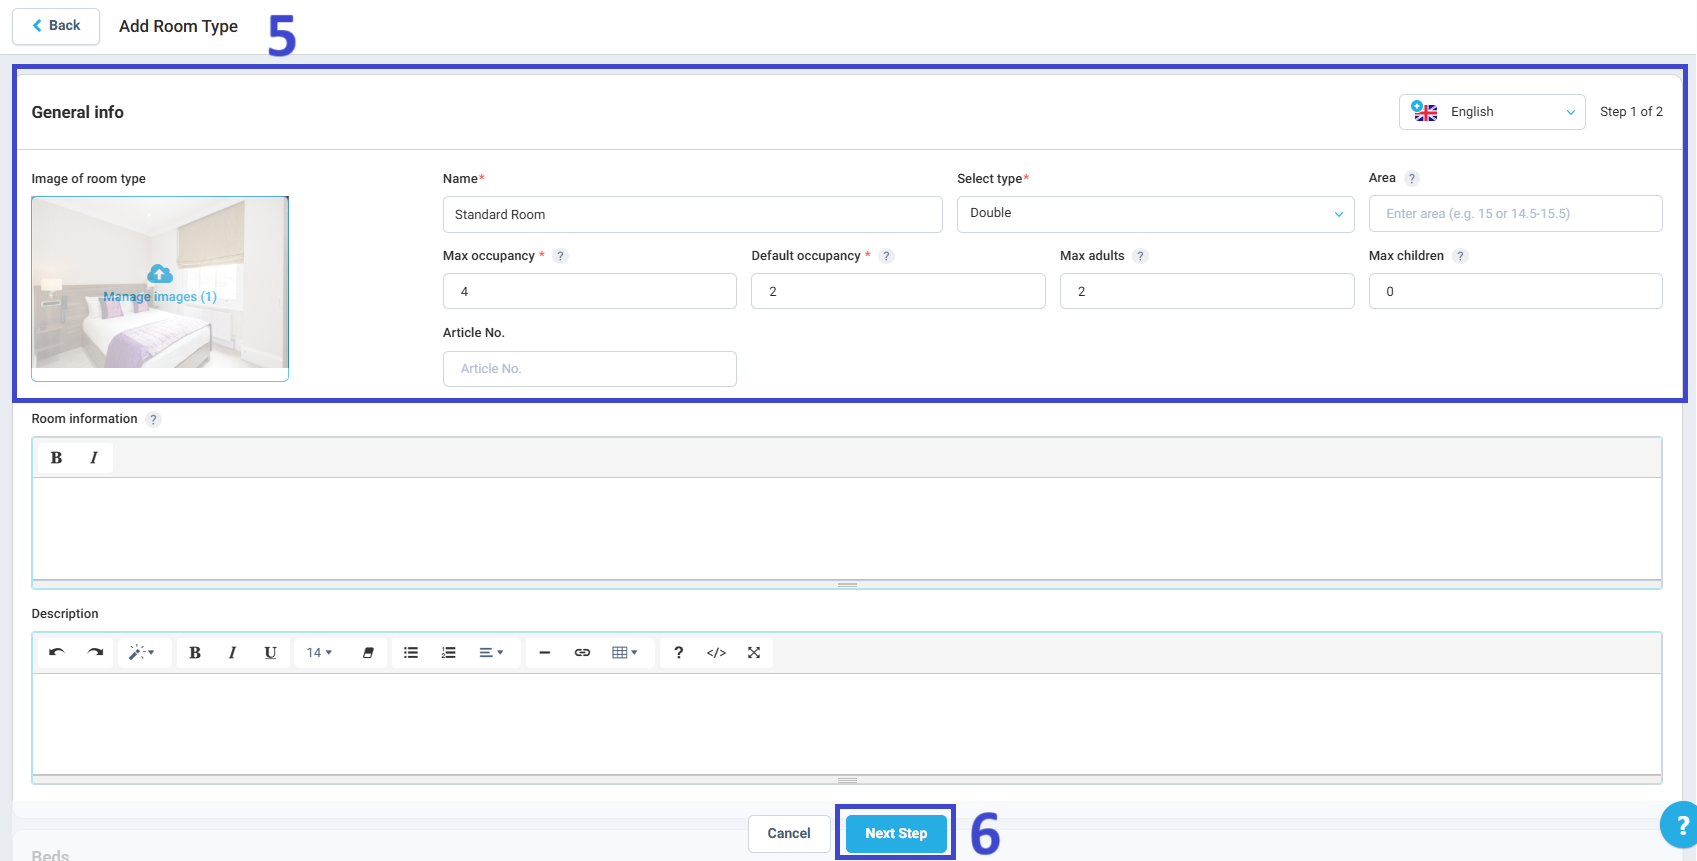
- Complete the room type details:
- Room Type Name – e.g., "Double Room", "Family Suite"
- Type
- Default Occupancy – Number of guests included in the rate
- Max Occupancy – Maximum number of guests allowed
- Description – Add a short description for internal and public view
- Amenities – Select the applicable amenities (Wi-Fi, air conditioning, etc.)
- Images – Upload high-quality images of the room
- Click Next step.
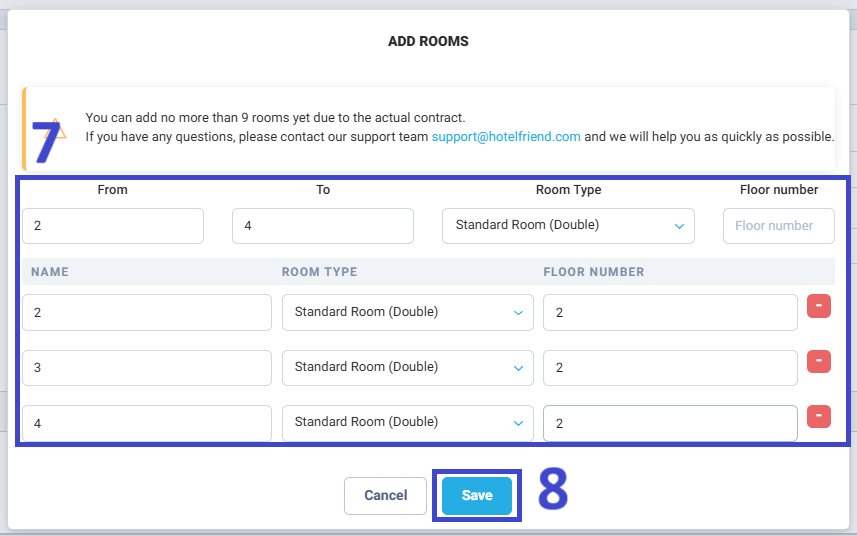
- Enter the number of rooms that correspond to this Room Type.
- Click Save.
How to set up room types:
- Scroll down to the Rooms section.
- Click Add Room.
- Assign the room to the relevant Room Type.
- Enter the Room Number, Floor, Area, General description, Beds, and Facilities.
- Click Save.
Then, proceed to creating individual rooms:
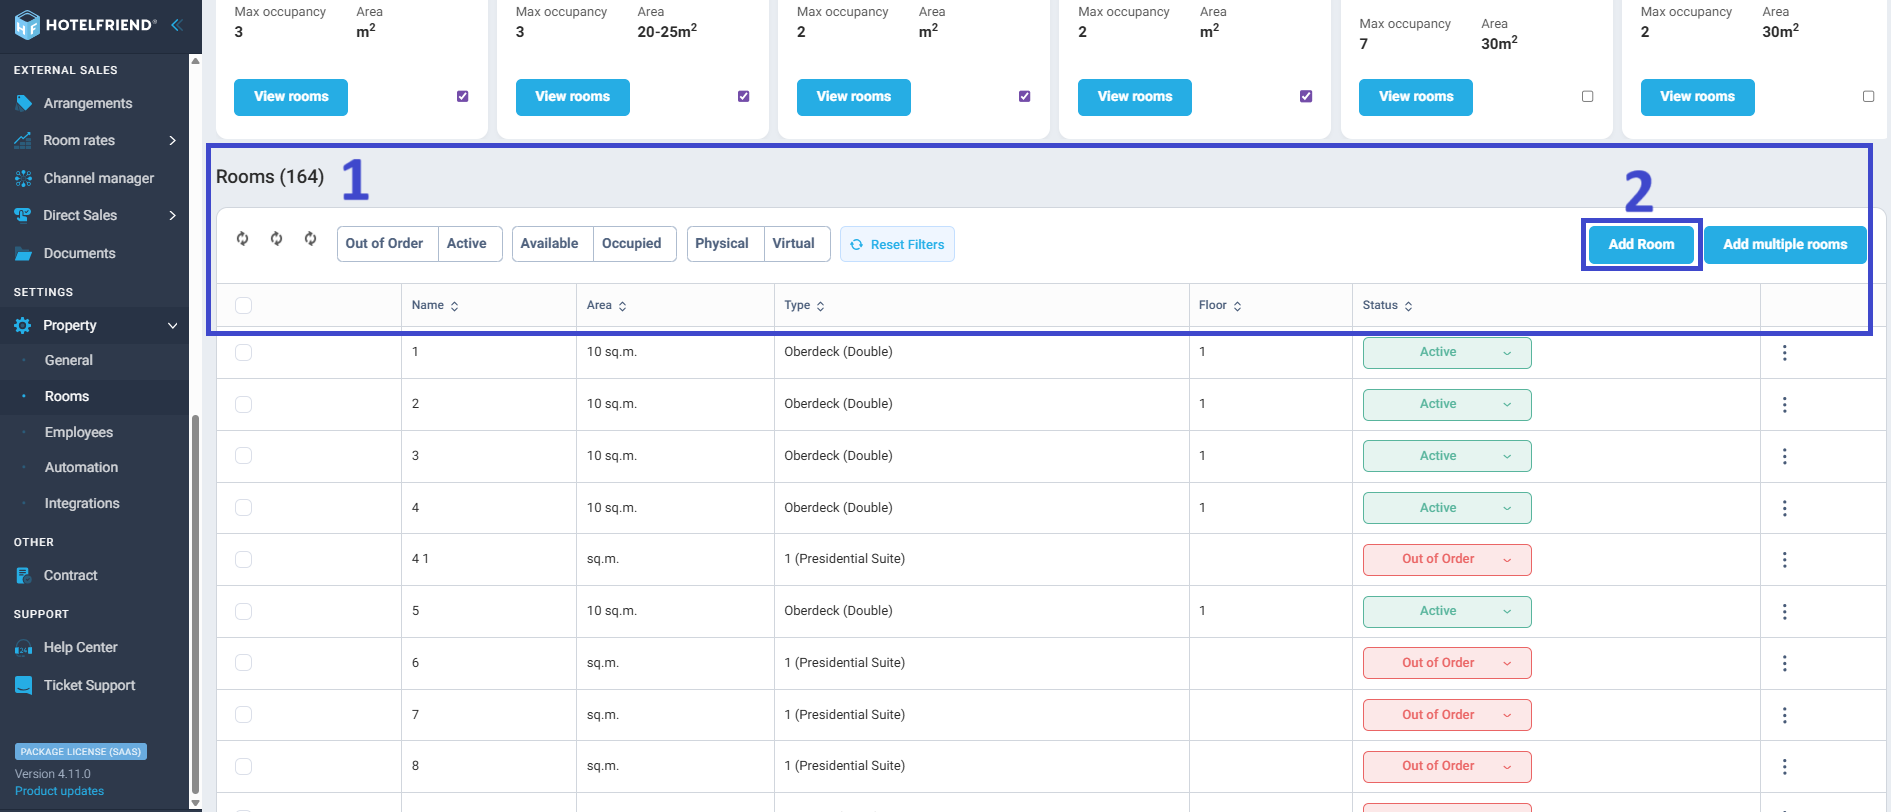

Tip: You can use filters to manage large room inventories and disable rooms temporarily if they’re under maintenance.
Step 3: Configure Cancellation policies
Cancellation policies define guest obligations when canceling a reservation. Transparent and flexible policies help prevent revenue loss and build trust with your guests.
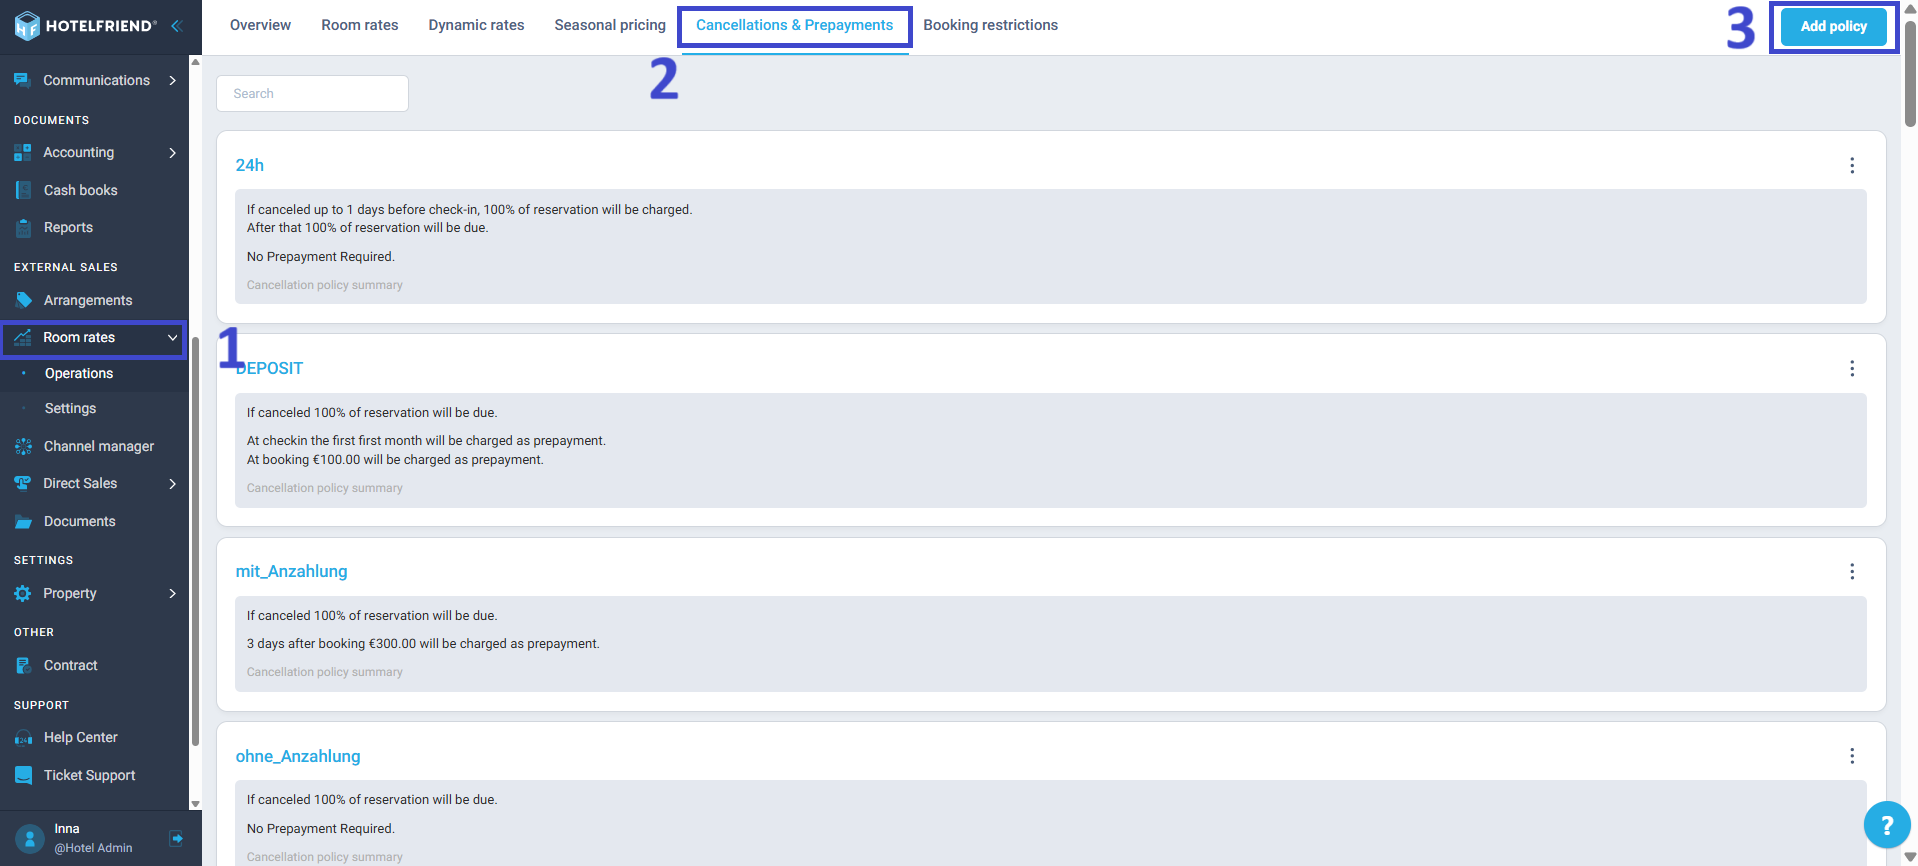
- Go to the Room Rates module.
- Click the Cancellations & Prepayments tab.
- In the upper-right corner, click Add policy.
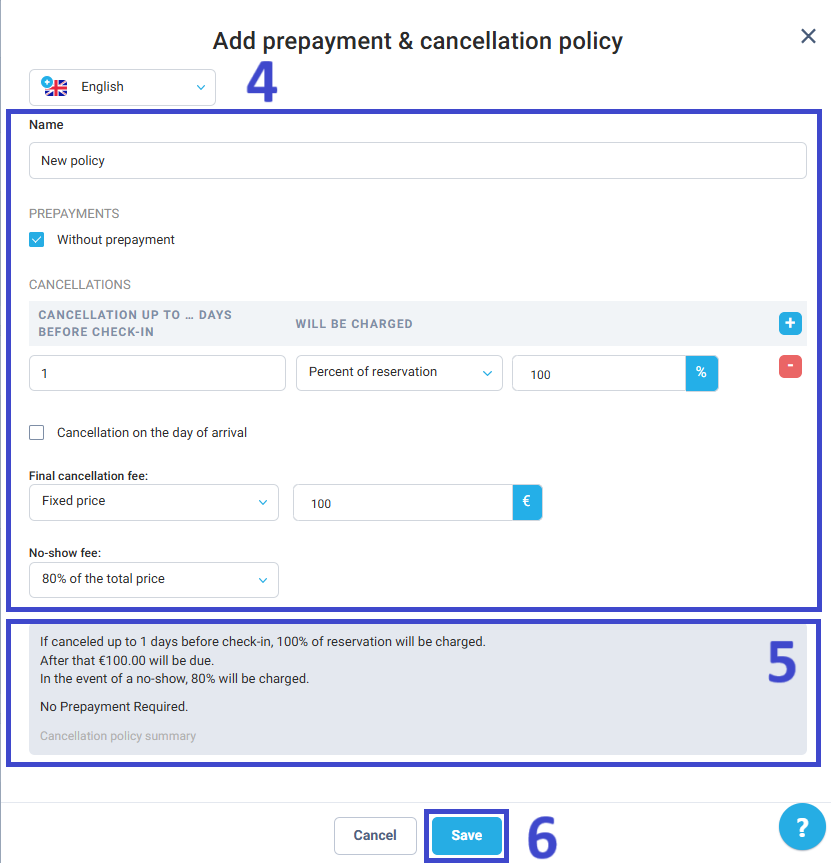
- Fill in:
- Policy Name – e.g., "Free cancellation up to 48h", "Non-refundable".
- Prepayments – Select with or without prepayment.
- Set up the cancellation rules and conditions – Set the time period when free cancellation is allowed and define penalties for late cancellations (e.g., 1st night, fixed price, %).
- Cancellation on day of arrival – Tick this option if cancellation should be allowed up to the arrival day.
- Final cancellation fee – Enter the penalty amount charged after the cancellation window ends.
- No-show fee – Define charges if the guest does not arrive without prior cancellation.
- Review the Cancellation policy summary.
- Click Save.
How to create a cancellation policy:
Tip: You can assign different cancellation policies to different rates or channels.
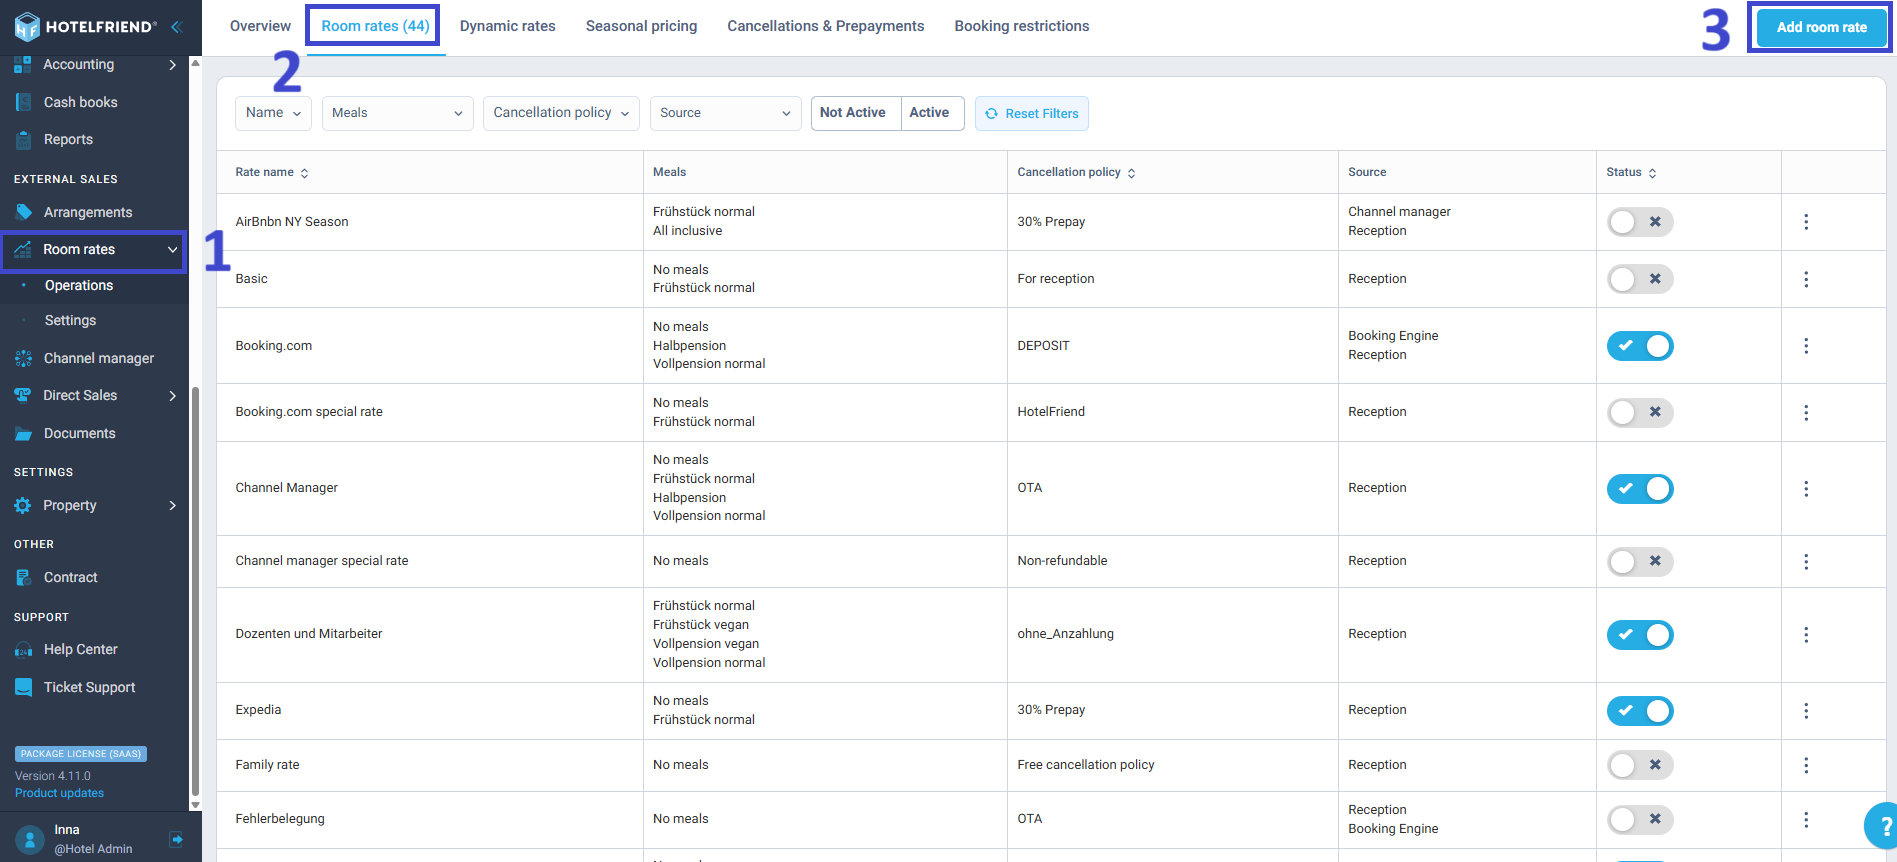
Step 4: Create Room Rates
Room rates define how much guests will pay, what’s included, and how the pricing is displayed across all your sales channels.
- Navigate to the Room Rates module.
- Go to the Room Rates tab.
- Click Add room rate.
- In the General Rate info section, fill in:
- Rate Name – e.g., “Flexible Rate with Breakfast”.
- Meal price – Select from the list or click Add new.
- Cancellation policy – Apply rules for cancellations and no-shows.
- Source – Choose where this rate should be available (e.g., Booking Engine, Reception, Channel Manager).
- Cleaning Fee – Add cleaning fee from the list or click Add new.
- VAT – Define tax rate applied to the price.
- In the Rooms to be sold at this Rate section:
- Set the price per room type.
- You can assign:
- Default price for all days
- Individual daily prices for more dynamic pricing (e.g., weekends vs. weekdays).
- Deselect room types that should not be bookable with this rate.
- Click Save.
How to set up room rates:

Tip: Dynamic pricing can be managed manually or through integrations with revenue management tools.
What’s Next?
Once you’ve completed the steps above, your hotel is ready to start accepting bookings through the PMS. To streamline your operations further and enhance the guest experience, we recommend finishing the following setup:
- How to set up a Booking Engine – Make your rooms bookable online via your website.
- How to set up Email Settings & How to set up Email Automation – Automate guest emails and booking confirmations.
- Check-in & Age Configuration – Define guest age groups, ID requirements, and arrival rules.
Still need help? Our support team is here for you via chat or email. Just click the help icon in the bottom-right corner of your dashboard.
